Tuesday, December 22, 2009

Saltine Cracker Toffee with Pecans

I first read about this recipe on the Front Porch Indiana blog. I just had to try it for two reasons. First..... I love toffee and second......I had to see how saltine crackers could taste like toffee.

Unbelievable....these taste just like Heath bars. They are also easy easy easy to make.

Saltine Cracker Toffee with Pecans

1 sleeve of saltine crackers (1/4 of a box)
2 sticks butter (I used unsalted)
1 cup packed brown sugar
12 oz. package semi-sweet chocolate chips
1/2 cup chopped walnuts or pecans (I used pecans chopped fine)

Preheat oven to 375°F.

Spray a cookie sheet with cooking spray. Line with foil and spray the foil. Cover with saltine crackers to fit size of cookie sheet. Set aside.In a saucepan, melt 2 sticks of butter. Add 1 cup packed brown sugar and stir until melted and mixture starts to bubble. Simmer over medium heat and allow to bubble for 3 minutes. Spoon evenly over saltines.Bake in 375°F oven for 8 - 10 minutes. Remove pan from oven and sprinkle with 12 oz. package semi-sweet chocolate chips. Return to oven another minute or until all chips are soft. Then spread softened chocolate chips evenly over toffee with knife. Sprinkle with 1/2 cup chopped pecans.Place cookie sheet in freezer or fridge until set and chocolate is hard. Break apart.

This is what the toffee looks like on the bottom side.Enjoy.

Monday, November 9, 2009

Angela Lansbury's Walnut Date Bread

I found this recipe online on several different recipe sites. I do not know if this is the Angela Lansbury of Murder She Wrote fame or not. But I will say that I have baked this bread on three different occasions and unlike Jessica Fletcher friends, no one died. Seriously, who would want Jessica Fletcher for a friend? All her friends or friends of friends end up dead. My suggestion would be to stay the h e double hockey sticks away from that b@%ch!!! And whatever you do....do not take a vacation to Cabot Cove, Maine. Also I could never understand how she could be an English teacher and solve all these murders. When was she in school? Would you want your kid around Jessica Fletcher? She also wrote best selling murder mysteries. I think Jessica was bumping off people just so she could write a book about it. Her next novel could very well be The Killing Breads, or To Kill a Date Loaf, or Mystery on Walnut Date Loaf Lane.Angela Lansbury's Walnut Date Bread

2 T unsalted butter
1 t baking soda
1 C boiling water
1 C chopped and pitted dates
1 C sugar
2/3 C walnuts chopped
1 egg yolk
1 3/4 C flour
2 t vanilla extract

Makes 1 loaf

Preheat oven to 325 degrees

Place butter, dates, baking soda, and boiling water in a heat proof bowl. Allow to cool. Mix walnuts, sugar, egg yolk, flour, and vanilla in a bowl. Add cooled date mixture. Stir until mixed. Pour into a greased loaf pan. Bake for 1 hour or until inserted toothpick comes out clean.

Cool 10 minutes and then invert loaf pan to release bread. Place on cooling rack tented with aluminum foil until cool. Keep bread wrapped in foil so bread does not dry out.

This bread is very moist, not too sweet, and just plain deleesh!!!

Tuesday, November 3, 2009

Pyrex Pizza Pan and Meijer Pizza Dough

I was shopping for small individual size loaf pans when I ran across a cool pizza pan. It was on sale for $10.99 so I said 'what the heck'. Then I got home and noticed a rebate form for $3.00 on the label.......yahoo!!!! I bought my pizza pan at Meijer.So back to the pan. It works great. After the pizza is done baking, I slide it right off the pan onto the cutting board. The pan has a wide lip/handle around the edge. This is a handy handle....a little pan pun.....oh boy...it's getting late.

Also while at Meijer I was looking in the frozen food case for Rhodes frozen buns. Located next to the buns were bags of frozen pizza dough. I thought 'what the heck, I'll try some'. It's the best dough and worth every bit of the less than 2 bucks a bag.I let mine un thaw for a day in the refrigerator. About an hour before you want to use it, remove dough from bag and place it in a bowl coated with vegetable oil. Cover with plastic wrap. The directions say that the dough needs to relax. I guess it was stressed out being in the plastic bag and frozen for who knows how long.Dust the pizza pan with corn meal before you spread the dough out to form approximately a 9 inch diameter pizza. Assemble pizza according to your liking and pop in the oven according to the instructions on the bag.
Remove from oven and slide pizza off onto a cutting board to cut. Do not cut while on pan as this will mar the pan's finish.
What I really liked about this dough is that it gets large bubbles. I like bubbles in my crust.

FYI...this pizza had mushrooms, mild yellow peppers, onions, ham, and green olives. I also found that if I put my ingredients on paper towels and soaked up the excess moisture that this really helps with eliminating soggy crust.

Sunday, November 1, 2009

Pumpkin Bread with Walnuts & Coconut

I baked three loaves of this very moist and delicious bread. It smells heavenly while baking. I plan on making more during the holidays.Pumpkin Bread with Walnuts & Coconut

3
1/2 C flour
2 C brown sugar (packed)
2/3 c sugar
1 can of pumpkin puree (15oz)
1 C coconut milk
2 t baking soda
1 t salt
1 t nutmeg
1 1/2 t cinnamon
2/3 C flake coconut
1 C chopped walnuts

Preheat oven to 350 degrees.

Combined dry ingredients in a bowl and mix thoroughly. Add pumpkin puree and coconut milk. I mixed the coconut milk and pumpkin puree in a separate bowl before I added it to the dry ingredients. The recipe didn't call for this but I found it easier. Once all ingredients are thoroughly mixed fold in coconut and walnuts.

Pour mixture into 2 loaf pans that have been greased.

Bake for 1 hour and 15 minutes or until a toothpick inserted into the bread comes out dry.

Remove from oven and wrap tightly with tin foil and let sit for 10 minutes. After ten minutes, remove tin foil and invert pan to release bread and place on a cooling rack. Tent tin foil over the bread and allow to cool completely. The bread should easily come out of the pan but be carefully not to burn yourself or damage the bread while removing from the pan.

Enjoy!

Monday, October 19, 2009

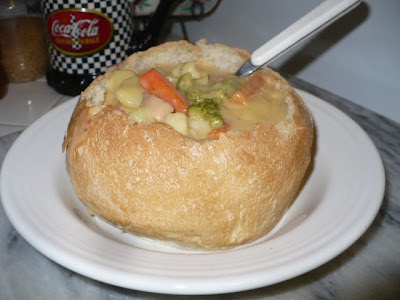
Bread Bowls for Cheesy Veggie Soup

Today I experimented and made a few bread bowls to use with the leftover cheesy veggie soup with diced ham I made yesterday. I got the idea for bread bowls from my daughter in law. She said that last year for the Chili Bowl race on PPV that they made bread bowls for their chili. I had an 'ah ha' moment.

When my sister and I went to the Taste of Home cooking school they were using Rhodes frozen bread and buns for several of their recipes. So I thought, why not use the frozen loaf bread and just cut in half before baking.

Here is how I made my bread bowls.

Makes 4 bread bowls

I thawed 2 loaves of Rhodes frozen white bread by placing them on a slightly oiled cookie sheet. I was able to cut each loaf in half once they were slightly thawed. Once the 4 pieces were completely thawed I used my hands to make the dough round. Then I placed 2 pieces on an oiled cookie sheet allowing enough room for the dough to rise. Place the cookie sheets in a warm area for 4 hours to completely rise. After 4 hours bake at 350 degrees for 25 minutes. Allow to cool before next step.To carve out the bowl I used a serrated knife to cut out the top much like how you do when carving a pumpkin for Halloween. Make sure you use a serrated knife as a regular knife doesn't cut through the crust as nicely as the serrated knife. This is what it looks like if you use a regular knife and not a serrated knife.Once the top is cut off pull out some of the bread to make a hollow area in the bread forming a bowl. Do not throw away the top crust and bread pieces, I used them in the soup instead of crackers.

Fill bread bowl with chili, stew, or thick soup. Enjoy.

Monday, October 5, 2009

Baked Custard with Sliced Pears

I found this recipe on the Carnation Milk website. They call the recipe Pear Oven Pancake. Don't ask me why they called it that but I have renamed it Baked Custard with Pear Slices.Baked Custard with Pear Slices
2 T butter melted
1/2 C flour
1/4 C + 2 T sugar
1/4 t salt
1 can (12 oz) Carnation Evaporated Milk
3 large eggs
2 ripe pears, peeled, cored, and sliced thinly
1/2 t cinnamon

Preheat oven to 450 degrees

Put butter in a deep dish pie dish and place in microwave for 1 minute to melt the butter. Swirl butter to coat the entire bottom.

Combine flour, 1/4 C sugar, and salt in medium size bowl. In another bowl whisk evaporated milk and eggs. Add milk/eggs mixture to flour mixture and whisk for 30 seconds. Pour batter into the butter coated pie dish. Arrange pears in a pinwheel slightly pushing pears into batter.

Sprinkle with cinnamon and remaining 2 tablespoons of sugar.

Bake at 450 degrees for 15-20 minutes. My oven required the entire 20 minutes.

Serve warm and refrigerate any uneaten custard.Added 10-8-09

This is soooooo good. It was very good warm but we both preferred it cold. I plan on baking another batch but I am going to use apples on one half and pears on the other. Maybe I'll try some nutmeg or pumpkin pie spice on the apple side.

Added 10-10-09

A friend sent me this email about Carnation Milk. I have no idea if it is true or not but it is cute.

Carnation milk -- 65 YEARS AGO ... This is PRICELESS

A little old lady from Wisconsin had worked in and around her family dairy farms since she was old enough to walk, with hours of hard work and little compensation.

When canned Carnation Milk became available in grocery stores in approximately the 1940s, she read an advertisement offering $5,000 for the best slogan. The producers wanted a rhyme beginning with 'Carnation Milk is best of all.'

She thought to herself, I know all about milk and dairy farms. I can do this!

She sent in her entry, and several weeks later, a black limo pulled up in front of her house. A man got out and said, 'Carnation LOVED your entry so much, we are here to award you $2, 000 even though we will not be able to use it!'


Monday, September 28, 2009

Cheesy Vegetable Chowder with Diced Ham

This recipe is for one of the comfort foods that was prepared at the fall Taste of Home cooking school that my sister and I attended last week.

I modified the recipe because the original recipe called for 1 medium potato (I used 4), did not include ham (R insists on some sort of meat in his soups), and I used frozen veggies instead of fresh.

Both R and I liked this soup. Don't be fooled....it is very filling.

Here is the modified version I made. If you want the original recipe search the Taste of Home site.

1 large bag of frozen veggies (mix of cauliflower, broccoli, carrots)
4 cups chicken broth
1 large slice ham steak (diced)
4 medium size potatoes peeled
1 teaspoon Worcestershire sauce
1/2 teaspoon cayenne pepper
4 tablespoons butter
1/4 cup flour
1 can (12 oz) evaporated milk
2 cups shredded sharp cheddar cheese

In a large pot (dutch oven) bring chicken broth to a boil. Add diced ham and diced potatoes and cook on med high until potatoes are cooked. Add in frozen veggies, Worcestershire sauce, and cayenne pepper. Cook until veggies are hot.

Meanwhile in another saucepan, melt 4 tablespoons butter over medium heat. Whisk in flour until smooth. Gradually add evaporated milk. Bring to boil and stirring constantly. Boil for 2 minutes or until thickened. Reduce heat and stir in cheese. Continue to stir until melted.

Slowly stir cheese sauce into vegetable/ham mixture.

Garnish with shredded cheese. I served with Rhodes dinner buns because they are hardy enough to hold up in the soup.

Wednesday, September 23, 2009

Pork Medallions wrapped in Bacon

Recently I noticed that Meijer had little round pieces of pork on sale. I was able to buy a package with 14 pieces for $7.00 making each piece 50 cents each. I think they call these medallions.

The recipe used about a third of a package of uncooked bacon to wrap 6 pieces. I used a toothpick to secure the bacon slice in place. After seasoning each piece I placed the medallions in a hot frying pan searing both sides. After pork was seared I turned the heat down to medium low and covered. The medallions took about 25 minutes to cook. I then turned off heat and let the meat rest for five minutes before removing from frying pan and serving.
We found that two pieces were the perfect portion size when paired with a large salad and baked potato.
Next time I purchase this cut of meat, I will divide the pork into freezer bags containing 4 pieces each. I think this recipe falls under the heading of cheap and easy.

Friday, September 18, 2009

Caramelized Pears and Pork Chops


Our pears trees are producing a plentiful supply of pears this year. Recently I saw a recipe for caramelized pears with pork chops. I couldn't find the recipe so I winged it.

I peeled and sliced 3 Asian pears. I placed them in a small covered saute pan with a slice of butter and cooked over medium heat. Once the pears were thoroughly cooked I drizzled the pears with honey and cooked for an additional 2 or 3 minutes.

Once pears were fully cooked and honey melted, I spooned pears on top of the cooked pork chops.

R gave the pears a thumbs up.

Friday, August 28, 2009

How to Reuse a McCormick Sea Salt Grinder

I love the little sea salt grinders from McCormick. I do not love the $2.99 price for a little bottle. I love the little mechanical grinder. I do not love throwing out something that works.

What to do....what to do?

I know...I'll take it apart while I watch David Letterman. Speaking of late night TV....isn't that Craig Ferguson funny? I only watch Dave while I wait for Craig. I miss Jay. I do not understand Conan at all.

After twisting and twisting and twisting some more I realized the top was not coming off. So lets be methodical about this. I got out a kitchen knife and pried on it. What? Oh come on.....tell me that isn't what you would do?

Well, the kitchen knife did allow me to slightly see inside the cap/grinder and made me realize that I could remove the cap/grinder if the plastic would give just a wee bit (no, I am not Irish). So I put a bowl of water in the microwave and heated up the water......not boiling but hot. You will only need enough water in the bowl to cover the plastic cap/grinder when the the bottle is placed upside down.I let the grinder sit in the water for about 5 minutes. Then I pried some more with the knife, moving the knife around the edge prying as I go. Thirty seconds later the cap was off.Now what? Besides sea salt and peppercorns....what can I put in these bottles?

Monday, August 24, 2009

Green Beans with Soy Sauce and Peanut Butter

I know...it sounds gross, doesn't it?

My nail tech Virginia gave me the recipe and assured me everyone loved it. I had to try it because it just sounded so unusual and I have a ton of green beans.

Here's the ingredients....

Green beans washed with ends cut offThinly sliced onions ( I used 1/2 of a small onion)
Olive oil
Soy sauce
Minced garlic (1 clove or I used 1 teaspoon of freeze dried minced garlic)
1 Teaspoon to 1 Tablespoon of peanut butter depending on amount of green beans

In a skillet pour about 1 teaspoon of olive oil. Once oil starts to shimmer add onions and garlic. Once onions start to get translucent add green beans and soy sauce (enough to coat the beans lightly). Cook over medium low until beans are slightly limp. Add peanut butter and allow to melt and coat green beans. Serve.Do not add salt as the soy sauce is salty enough.

Just to make sure R was unbiased in his opinion, I kept all ingredients a mystery. I waited until he had ate all of his green beans and then asked, "how did you like the beans?" He said, "they were good but you did something different." That's when I told him what was in the beans. I saw a weird look come over his face and then he said, "not bad."

Friday, August 21, 2009

Stuffed Chicken Breast Wrapped with Bacon

This is a modified recipe I found in Gourmet or Food Network magazine. * I just found the recipe and it was in bon appetite magazine. The original recipe called for the chicken breast to be wrapped in prosciutto ham and stuffed with a slice of butter.I chose to stuff the chicken breasts with chicken flavored Stove Top Dressing. I bought the dressing in a canister because I only needed a cup or two and not the amount I would have made if I bought the box.

Stuffed Chicken Breast Wrapped with Bacon

4 boneless skinless chicken breasts
2 cups of cooked Stove Top Dressing, chicken flavor
1 lb bacon uncooked

Make stuffing according to directions on box or canister. Trim excess fat off of chicken breasts. Using fillet knife (be careful) cut a pocket into the breast. Stuff with stuffing. Wrap uncooked bacon around the breast. If you hold one end of the bacon slice with your thumb you can wrap the bacon quite tight around the breast. Each breast take about 3 slices.

Place the breast in a hot skillet with the loose ends of the bacon on the bottom of the breast. Fry until bacon is almost completely cooked. Be careful and flip the breast over and cook until bacon is almost completely cooked. Transfer the breast to a baking a dish and bake breast uncovered for 30 minutes at 400 degrees. Check temperature and when interior of breasts are 165 degrees or greater the breasts are fully cooked. Watch carefully so that the breasts do not burn. Nothing worse than burnt breasts!!!!I have also cooked the chicken in the same skillet I used to cook the bacon. I just reduced the temperature setting to medium low and placed a lid on the skillet. Depending on size of breasts, cook between 35 and 45 minutes.
I cook four breasts but we usually only eat 2 between us. The remaining two warm up nicely in the microwave the next day. What is interesting is that as the bacon cools it shrinks and gets tight around the chicken so the stuffing stays in and does not fall out.

Today's meal was completed with fresh green beans and a tossed salad made with veggies from our garden and B's Mom's garden. The tomatoes are heirloom varieties called Pineapple (yellow with pink tinge) and Amish Paste (Roma style).

Sunday, July 26, 2009

Pea Pods and Beef with Rice

I sent R to the store to get a bag of frozen pea pods....he came home with a bag of green beans. I specified on the list.......pea pods. So back to the store he went and then he came home with a bag of sugar snap peas. Ladies....he's all mine.....you can't have him.

While I was preparing the food he walked by and said, "those aren't pea pods." Then I gave him 'the look' and he went away.

Even those the pea pods weren't pea pods it was still very good.
1 London Broil steak sliced thinly
1 small white onion sliced thinly
1 bag of frozen pea pods
1 can of sliced or chopped portobello mushrooms
3 C of cooked Jasmine or Basmati rice
1 T flour
2 beef bouillon cubes
salt, pepper, garlic salt to taste

Cook onions until they start to get translucent, add sliced meat. Cook at medium to medium high until meat is cooked. Add 1 C of water and two beef bouillon cubes, until dissolved. Add 1 tablespoon of flour to make a slight gravy. Add pea pods and mushrooms. Cook at low medium until pea pods and mushrooms are cooked.

While meat and pea pods cook prepare the rice according to directions.

Spoon beef mixture over rice.

Tuesday, July 14, 2009

Easy Chicken and Rice

This is one of those cheap and easy recipes.1 package of boneless skinless chicken breasts or chicken strips
1 bag of frozen veggies
2 cans of cream of chicken soup
1 can of water
1 cup uncooked Basmati or Jasmine rice
2 cups of water

Brown chicken on both sides in a deep skillet. Cook for 10 minutes. Reduce heat to medium low. Add two cans of cream of chicken soup and one can of water. Mix thoroughly. Add one bag of frozen veggies. Mix together and cover skillet with lid. Cook for 30 to 40 minutes or until chicken is thoroughly cooked. Season with salt, pepper, and a dash of dill weed.

While chicken is cooking. Boil 2 cups of water and 1 cup of Basmati rice. Once mixture comes to a boil reduce to simmer and cover. Cook on simmer for 15 minutes. Remove from heat and let sit with lid in place for 5 minutes.

Serve chicken and veggies on top of cooked rice.

I have substituted frozen veggies with a large can of stir fry vegetables drained thoroughly. Cooking instructions are same as above.

Tuesday, June 30, 2009

Guacamole Burgers

I'm stealing a recipe from Barbara and Gavin.Several Sundays ago we were at their house and decided to BBQ. Gavin concocted some sort of guacamole, he says it is a secret recipe but I saw salsa being added to smashed avocado and he was using some seasoning too.Well anyways we then put this guacamole on our burger and it was great.This was the first time I have ever had guacamole on a hamburger and I must say I was surprised at how well it went with hamburger.

I don't have any recipe details but I guess you could use any guacamole recipe.

Sunday, June 14, 2009

Strawberry Coconut Cake

Both R and Barbara (my daughter in law) have June birthdays just several days apart. So what better way to celebrate a birthday than with a cake made with fresh strawberries. This recipe came to me by way of the blog, Daisy Cottage. If you love the cottage look...this blog is for you.
This cake recipe combines both store bought packaged items and fresh items. The cake is very very moist and holds together well when sliced...even the first slice (always the hardest) came out perfect.

Strawberry Coconut Cake

1 1/2 boxes of white cake mix
5 eggs
2 C water
3/4 C vegetable oil
1/2 box strawberry jello (3 oz size)
1/2 C chopped strawberries (I used 3/4 to 1 C)

Combine all ingredients in a large bowl and mix thoroughly. Fold in strawberries. Fill three (3) round cake pans that have been sprayed with vegetable oil spray each with 1/3 of batter. Bake at 350 degrees for 22 minutes or until toothpick is dry when poked into cake. Let cool completely before frosting.

Strawberry Coconut Icing

16 oz sour cream
1 1/2 C granulated sugar
1/2 box of jello (3 oz size)
7 oz bag shredded coconut
1/2C chopped strawberries
1 8 oz cool whip

Combine all ingredients except cool whip. Mix thoroughly. Use a 1/3 of mixture between layers 1 and 2. Another 1/3 of the mixture between layers 2 and 3. Fold cool whip into remaining mixture. Use this mixture to frost the entire cake. HINT After I folded in cool whip I placed the mixture in the refrigerator for 30 minutes to set up. I also placed the cake back in the fridge also. After frosting the entire cake I decorated with sliced strawberries. Store cake in fridge until ready to serve (because of the sour cream and cool whip).

This cake is very tall because the 3 layers are thick layers so make sure your cake cover is tall enough. If it is not...you could always trim the top of the individual layers to make them thinner. This would also make the cake flatter and less likely to have a layer slip or have the cake not level. Mine was slightly askew but it seems all my cakes are like that. I blame it on the oven.....it just couldn't be me!!!Enjoy!!!

Saturday, June 13, 2009

Canning Class in Battle Creek

My sister Ranee and I attended a canning class in Battle Creek last Saturday. It was a combination of hands on and observation. We observed pressure cooker canning and performed the hot water bath/steaming method by canning bread and butter pickles and bruschetta to take home. We also made carrot and fennel soup for lunch and freezer jam to take home.The soup was ok, not something I would make let alone take the time to can. I think the soup would have been better served with a little cream mixed in more like a volute. The freezer jam was very delicious. It was a Lemon Raspberry Strawberry Jam. Very tasty but I don't understand why anyone would go through all that only to freeze it for up to 6 months. I really don't have space in my freezer and would much rather use the traditional canning method that would allow me to store the jam on a shelf for up to a year.

The bread and butter pickles were also tasty but both my sister and myself along with the other women at our table all felt that the pickles needed to be sliced very thin. Their recipe called for 1/4 inch thick slices. You cannot fill the jars completely when the slices are that thick. All the bread and butter pickles I have ever tasted were all thinly sliced. I think that the thin slices would work better on sandwiches and burgers plus it better utilizes the space in your jar.

The class lasted 3 hours and along with several jars of pickles, bruschetta, and freezer jam we also received a tote bag, Ball Recipe book, several canning utensils, and an apron.

Fun was had by all...then it was on to shopping because it's a law of nature that when two sisters get together....they must shop.

Saturday, May 30, 2009

Potato Salad with French Dressing

I first made this potato salad when I was a teenager. I'm sure I used a recipe but since I no longer have the recipe...I had to just wing it. This potato salad is not your typical potato salad. I like it better than the traditional drier tangy type of potato salad. The celery makes it crunchy and fresh tasting. I'm a big fan of boiled eggs in potato salad, not necessarily the yolk but the white part. So if you are watching your cholesterol just omit the egg yolks.
Potato Salad with French Dressing

6-8 medium potatoes
1 small size mild white onion diced in small pieces
3 celery stalks diced aprox 1 cup
6 boiled eggs diced with or without yolks
1/2 cup mayo
1/2 cup french dressing
paprika to garnish
salt to taste

Peel and cut potatoes into similar size, place into pan with cold water. Cook until tender on medium to medium high heat. Drain and let cool. Dice after potatoes are cold.

Put eggs in cold water and cook on medium heat. Place eggs into cold water until the eggs are cooled. Peel and dice.

Dice celery stalks. I usually cut the stalks lengthwise into 3 pieces and then dice. This gives me more uniform and smaller pieces.

I toss the potatoes, celery, and onion in a large bowl. In a small bowl I combine the mayo and french dressing until thoroughly mixed. Pour this mixture over the tossed potatoes, celery, and onion. Once all ingredients are covered with the mayo/french dressing mixture add the diced eggs and lightly toss so as to not break the egg whites. Salt to taste.

Garnish with paprika.

I like to place my potato salad in the refrigerator for at least an hour before serving.

Enjoy!